Tuesday, June 28, 2011
Amazon Package
No, this isn't a tutorial on how to open a package from Amazon, but I thought you'd like to open this one with me...Yes! A quilt book! Woo Hoo! Kaffe Fassett has a new book coming out in a few months and I couldn't let myself pre-order the new one until I have the one I am missing. I hardly ever buy quilt books anymore, but I always buy Kaffe's :) I've been quilting for 18 years now so I really don't need basic technique books, but there's always room on my bookshelf for inspiration, and if there's one thing Kaffe's books are full of, it's inspiration. I haven't even looked through it yet - I think I'll save it for tomorrow, outside at the picnic table with a cold drink. These things must be savored you know!
Monday, June 27, 2011
Tomato Block
Remember my pumpkin/tomato dilemma? I just HAD to use that gorgeous red tomato-ey fabric somehow, so why not design a block around it? Presenting tomatoes on a vine...Yes I cut out two different vines. I thought I'd show you as it's all part of the auditioning process. First I cut the darker Kaffe fabric but I didn't like it against the busy tomato fabrics, so then I cut out the lighter olive green vine and I think I like it better. I do this a lot. Don't be afraid to cut up your fabric - you can always use the rejected shape in a different project!
It's not basted down or appliqued yet so the leafy bits on the petals look a lot bulkier than they will be. You just need to use your imagination!
Sunday, June 26, 2011
Seen-It-Sunday
Today I have 3 things to show you. One is quilty, one is crafty, and one is tasty. How can you go wrong with that combination?
OK, first up the quilty. One of my very favorite folk art applique artists is Sue Spargo. I love her color choices, I love her designs, I love her use of wool and embroidery mixed in with quilting cottons - I love everything she does! I want to be Sue Spargo when I grow up! Here is an example of one of her designs...How could that not make someone happy?! Go check out her blog HERE to see more.
Second up is the crafty thing. Got an old lamp that you don't know what to do with? How about this...Isn't it so perfect for a sewing room? Tutorial for it is HERE.
And thirdly, something tasty. It's that time of year here in the US when we all start hanging out by the firepit making S'mores. Look at this twist on it...Can you say yum?! What a great idea to just pile it all into a sugar cone. You have to go see how to do it HERE. Pure genius!!
I hope you all had a great productive week and if you didn't, there's always this week!
OK, first up the quilty. One of my very favorite folk art applique artists is Sue Spargo. I love her color choices, I love her designs, I love her use of wool and embroidery mixed in with quilting cottons - I love everything she does! I want to be Sue Spargo when I grow up! Here is an example of one of her designs...How could that not make someone happy?! Go check out her blog HERE to see more.
Second up is the crafty thing. Got an old lamp that you don't know what to do with? How about this...Isn't it so perfect for a sewing room? Tutorial for it is HERE.
And thirdly, something tasty. It's that time of year here in the US when we all start hanging out by the firepit making S'mores. Look at this twist on it...Can you say yum?! What a great idea to just pile it all into a sugar cone. You have to go see how to do it HERE. Pure genius!!
I hope you all had a great productive week and if you didn't, there's always this week!
Saturday, June 25, 2011
Garden Beds Built!
Amazingly, we didn't have any rain today so I was able to spend the day building my other two garden beds and getting them all into place. It took me two extra trips to Home Depot (extra lumber and more deck screws) but what building project doesn't? Luckily HD is about a 2 minute drive from our house so it could be worse.
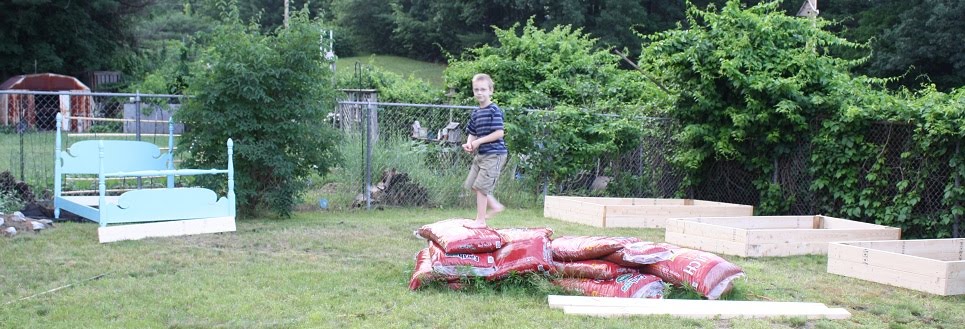
My youngest boy stayed with me the entire time helping. He handed me the screws and then near the end I let him use the power drill (with help from me of course!) and he was in heaven. I think I have a future carpenter on my hands!I thought you'd like to see the real garden 'bed' that I'm using... It was a bed I bought from the thrift store and painted for my daughter but it was the wrong size. I thought it was a twin but it was actually a full. See what I mean?!!(And you thought there wasn't going to be a quilt in this post!)
It's been sitting in the basement for a few months and isn't going to be used so why not make use of it in the garden?!I still need to attach the lumber I bought for the sides and ends, but I'm too pooped to do it right now. Plus it's dusk and the mozzies are coming out!Now, I think I'll head to my quilt room and do some sewing. Yes that's how I relax!
My youngest boy stayed with me the entire time helping. He handed me the screws and then near the end I let him use the power drill (with help from me of course!) and he was in heaven. I think I have a future carpenter on my hands!I thought you'd like to see the real garden 'bed' that I'm using... It was a bed I bought from the thrift store and painted for my daughter but it was the wrong size. I thought it was a twin but it was actually a full. See what I mean?!!(And you thought there wasn't going to be a quilt in this post!)
It's been sitting in the basement for a few months and isn't going to be used so why not make use of it in the garden?!I still need to attach the lumber I bought for the sides and ends, but I'm too pooped to do it right now. Plus it's dusk and the mozzies are coming out!Now, I think I'll head to my quilt room and do some sewing. Yes that's how I relax!
Friday, June 24, 2011
How To Replace A Button Tutorial
I was saying to my hubby today that I didn't know what to blog about and that the only sewing I had planned for today was to replace buttons that had come off two of his shirts. I told him that I guessed I would just take a photo of that and call it a day. He said, "Why don't you do a tutorial on how to replace a button?" I laughed. I mean, really? What quilter needs a tutorial on something so elementary as that?! He told me that you never know who might need to know how, and perhaps a mother would tell her college-bound son to look at it!
So here, in all it's basic glory, is how I replace buttons on my hubby's shirts.
1) Find a button to use. If you are lucky, the shirt will have a spare button or two sewn on the wrong side somewhere. Just like a car has a spare tire! Sometimes it's near a side seam, sometimes on the wrong side of the front facing, and usually near the bottom.
I was lucky with this first shirt as it had a 2 spares on the back of the front facing. Phew! Get a pair of scissors and carefully cut the threads holding the spare button until it comes off. If you don't have a spare, go down to number 7 to see what to do.
2) Clean up the area. You will probably have a little bunch of threads where the old button used to be. Just snip these off so you have a nice flat surface to attach the new button to.
3) Pick your thread. Have a look at the other buttons already on the shirt. What color thread are they sewn on with? Try to use one as similar as possible.
4) Thread your needle. When I applique I use a single thread. But when I sew on buttons I always use at least a double thread. Knot your threads together at the end.
5) Start sewing on the button! Place your button where the old one used to be and start sewing it on, first coming from the back to the front. Have a look at the other buttons to see what pattern of sewing is used. Some buttons will be sewn in a criss-cross pattern, and others will be in a simple dash. Do yours the same way!Go through each hole several times. If you only sew it down once, more than likely the button will come off rather quickly. I go through each hole at least 4 times.
6) Finishing up. When the button is secure, take the needle to the back and take several tiny stitches on one spot, snip the threads and you are done! That wasn't so hard was it?!
7) If your shirt is like my hubby's second shirt and doesn't have a spart button you will need to find one! I have a box of old buttons that I use just for this purpose.I pick up old jars of buttons at thrift stores and garage sales. I found one for his second shirt that was almost a perfect match in my box! However, if you can't find a good match or don't have a button collection, you can always go to your local craft store and buy one. Or look at other shirts and see if they have a spare. Or ask your neighbor. Or steal one from your kids'/brother's/roommate's clothes. OK not really, but you get the idea!
So here, in all it's basic glory, is how I replace buttons on my hubby's shirts.
1) Find a button to use. If you are lucky, the shirt will have a spare button or two sewn on the wrong side somewhere. Just like a car has a spare tire! Sometimes it's near a side seam, sometimes on the wrong side of the front facing, and usually near the bottom.
I was lucky with this first shirt as it had a 2 spares on the back of the front facing. Phew! Get a pair of scissors and carefully cut the threads holding the spare button until it comes off. If you don't have a spare, go down to number 7 to see what to do.
2) Clean up the area. You will probably have a little bunch of threads where the old button used to be. Just snip these off so you have a nice flat surface to attach the new button to.
3) Pick your thread. Have a look at the other buttons already on the shirt. What color thread are they sewn on with? Try to use one as similar as possible.
4) Thread your needle. When I applique I use a single thread. But when I sew on buttons I always use at least a double thread. Knot your threads together at the end.
5) Start sewing on the button! Place your button where the old one used to be and start sewing it on, first coming from the back to the front. Have a look at the other buttons to see what pattern of sewing is used. Some buttons will be sewn in a criss-cross pattern, and others will be in a simple dash. Do yours the same way!Go through each hole several times. If you only sew it down once, more than likely the button will come off rather quickly. I go through each hole at least 4 times.
6) Finishing up. When the button is secure, take the needle to the back and take several tiny stitches on one spot, snip the threads and you are done! That wasn't so hard was it?!
7) If your shirt is like my hubby's second shirt and doesn't have a spart button you will need to find one! I have a box of old buttons that I use just for this purpose.I pick up old jars of buttons at thrift stores and garage sales. I found one for his second shirt that was almost a perfect match in my box! However, if you can't find a good match or don't have a button collection, you can always go to your local craft store and buy one. Or look at other shirts and see if they have a spare. Or ask your neighbor. Or steal one from your kids'/brother's/roommate's clothes. OK not really, but you get the idea!
Thursday, June 23, 2011
Garden Bed
Power tools can be a girl's best friend! I don't spend ALL my time quilting, and this is what I have just spent the last hour making...Isn't that cool?! I have a corner in the back yard that I am transforming from a whole lot of nothing to hopefully something beautiful. This is how it looks right now...Sorry, I don't have an "after" shot just yet! I have dug out a line of sod in a curved shape, and started to lay down weed matting over the entire corner. You can see just a little of it done right at the back by the fence. I'm then covering it completely with mulch. See all those bags? I will also have 4 garden beds in there. The one above is the first one. I will make 2 more just like it, and I have an old full size bedframe(double for down under folk) that I am actually going to use as a "garden bed"! Don't you love the play on words?!
I can't lay any more of the matting/mulch down until the beds are made and in place. I had plans to get them all made yesterday but then it rained...and rained...and rained...with more forecast for today, but there was a break in the rain so I ran out and made this one. Not 5 seconds after putting in the last screw, you guessed it - it started to rain again!
This thing is heavy. I went with 2x6x8's instead of 1x6x8's, so it's twice as heavy as it was going to be, but it sure is nice and solid! Now my only problem is how to get it from where it is, all the way into that back corner!
I can't lay any more of the matting/mulch down until the beds are made and in place. I had plans to get them all made yesterday but then it rained...and rained...and rained...with more forecast for today, but there was a break in the rain so I ran out and made this one. Not 5 seconds after putting in the last screw, you guessed it - it started to rain again!
This thing is heavy. I went with 2x6x8's instead of 1x6x8's, so it's twice as heavy as it was going to be, but it sure is nice and solid! Now my only problem is how to get it from where it is, all the way into that back corner!
Wednesday, June 22, 2011
Subscribe to:
Posts (Atom)